🌕 The Moon
How to line up the moon behind a subject

A giant moon sitting perfectly behind a lighthouse is not a lucky frame — it is two solvable problems stacked together. One is optics: how big the moon looks relative to your subject. The other is geometry: where to stand and exactly when the moon passes through that spot. Get both right and the shot stops being a fluke.
The iconic “giant moon behind a landmark” image looks like it needs a once-in-a-lifetime sky. It doesn’t. The moon does the same thing every month, on a schedule you can read in advance. What makes the shot rare is that almost nobody combines the two things that produce it: making the moon loom large in the frame, and being in the one spot where it lines up with your subject at the one minute it passes through. Solve those separately, then put them together.
Why the moon never actually gets bigger
Start with a fact that feels wrong: the moon’s apparent size barely changes. It spans about 0.5 degrees of sky — roughly half the width of your little finger held at arm’s length — and that figure holds whether it’s on the horizon or overhead. The “huge moon low on the horizon” you remember is mostly the moon illusion, a trick of perception, plus a little real atmospheric magnification near the horizon. A supermoon (full moon near its closest approach) is only about 14 percent wider than at its farthest point — a modest, real difference, but not one you can build a shot on.
So you can’t make the moon bigger. You can only make your subject smaller in the frame — and that is the whole game. This is telephoto compression: the moon sits about 384,000 km away, effectively at infinity, so its size on your sensor is fixed by focal length alone and ignores how far you stand. Your subject is close, so backing away shrinks it fast. Stand far back, frame the now-tiny subject with a long lens, and the fixed-size moon fills more of the frame relative to the subject. The further back you stand and the longer the lens, the more the moon dwarfs it.
A rough sense of scale, for a lighthouse-sized subject and a full-frame camera:
| Focal length | How the moon reads |
|---|---|
| 200 mm | a clear disc, but small beside the subject |
| 400 mm | large and dramatic — the classic look |
| 600 mm+ | the moon dominates; subject reduced to a silhouette |
There’s a ceiling worth knowing: long teles shooting over heated ground or distant haze suffer atmospheric turbulence that softens the moon’s edge. A clean, cool evening at moderate distance often beats a brutally long lens through bad air.
Alignment is a stopwatch problem
Compression decides how the shot looks. Alignment decides whether it happens at all. From any one camera position, the moon only sits behind your subject for a narrow window — because the moon is moving the whole time. It crosses roughly its own diameter every two minutes, which means the perfect overlap can last under a minute. You cannot eyeball this in the field.
The moon’s position is two angles:
- Azimuth — its compass bearing (0° N, 90° E, 180° S, 270° W). This decides whether the moon is behind your subject as seen from where you stand.
- Altitude — its height above the horizon in degrees. This decides whether it sits at the top of your subject, beside it, or already climbing past it.
For the overlap to land, the line from your camera through the subject’s top has to match the moon’s azimuth and altitude at the same instant. Move your camera a few hundred metres and that line — and the required moment — changes completely. The moonrise azimuth itself drifts month to month, so a position that works in one season won’t in another. This is exactly the geometry our broader guide to photographing the moon and full-moon rises walks through, and it’s why guessing fails.
Let the planner solve the geometry
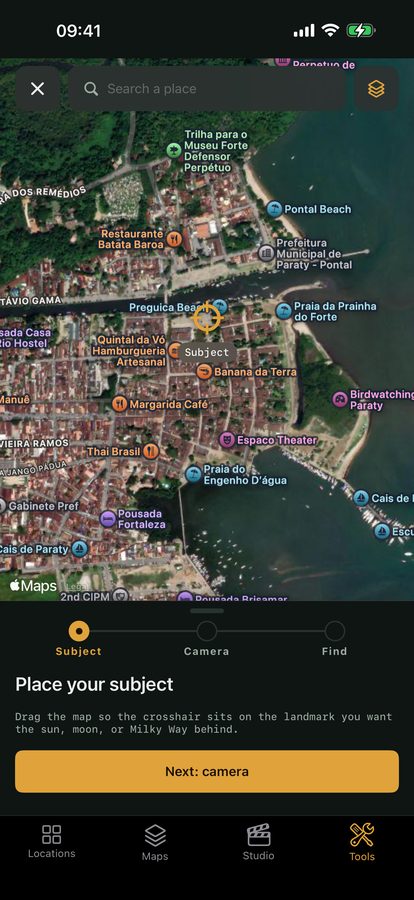
This is what an alignment planner is built for. Instead of doing spherical trigonometry on the tailgate of your car, you give it the inputs and it searches time for you. In the alignment planner you drop a pin on your subject, drop a second pin on your intended camera position, choose the moon as the target, and enter the subject’s height. It computes the line from camera to subject-top, then scans forward to find every date and minute the moon’s azimuth and altitude put it right behind — moonrise, moonset, or a pass in between.
That turns an impossible eyeball job into a short list — for example: stand here, on this evening, the moon clears the lighthouse lamp around 21:08 and holds for roughly a minute and a half. With that in hand you can scout the actual camera spot in daylight, confirm the sightline is clear, and check your long lens reaches.
Combine both for the postcard shot
The two ideas reinforce each other when you stack them deliberately:
- Pick a moonrise near full phase. A full moon rises at sunset, so it appears low and bright while there’s still warm light on the landscape — the difference between a glowing scene and a black silhouette under a white disc. The full moon shifts about 50 minutes later each day, so the days just before and after full each offer a usable rise at a slightly different time and bearing.
- Find a camera position far enough back that compression makes the moon loom. This often means standing one to several kilometres away with a 400–600 mm lens. Far-back positions also press the moon against the subject more convincingly.
- Let the planner pin the moment from that exact spot, then arrive early and set up well before the window.
For the exposure and field mechanics once you’re in position — metering for a bright moon against a darker foreground, focus, and shutter speed — our companion guide on how to photograph a full moon rising carries the settings side. Viewpoint runs the search on-device, so you can do this planning offline in the field, then re-check it the evening of the shoot as conditions firm up.
Quick-start checklist
- Frame for compression: stand far back from the subject and use a long telephoto (400 mm+ for the classic look) so the fixed-size moon dwarfs a small subject.
- Choose a moonrise near full phase so the moon is bright and rises around sunset, keeping light on the landscape.
- Set both pins — subject and camera position — plus the subject’s real height in the alignment planner.
- Let the planner find the day and minute the moon’s azimuth and altitude line up; don’t try to eyeball a target that moves its own width every two minutes.
- Scout the camera spot in daylight to confirm a clear sightline and that your lens reaches.
- Arrive early and shoot the whole window — the perfect overlap can last under a minute.