
Features
Studio
You did the scouting, made the drive and got the shot — now share it. Viewpoint’s Studio tools turn a finished photo into something built for the way social feeds actually show your work: a swipeable carousel, a smooth vertical video, a profile-grid mosaic, a card that shows off exactly how you got the shot, or a behind-the-scenes reel that pairs your setup with the result. And when you just need a big export to fit somewhere — an upload limit, an email, a print-lab form — Compress trims it to a size you choose.
Everything runs right on your device — your photo is never uploaded to make any of this. You pick a picture, Viewpoint does the work, and you save the finished files straight to your device, ready to post.
Every tool below is live on iPhone and on the web today. Studio is coming to Android too, with seven of these tools in its first release — here’s exactly what it will do there.
Pano Slicer — one photo, one swipeable carousel
A wide photo posted whole shrinks to a thin strip nobody stops to look at. Pano Slicer cuts it into a set of tall tiles that you post as a single carousel — so as your followers swipe, the scene scrolls past continuously, at full height, the way you saw it.
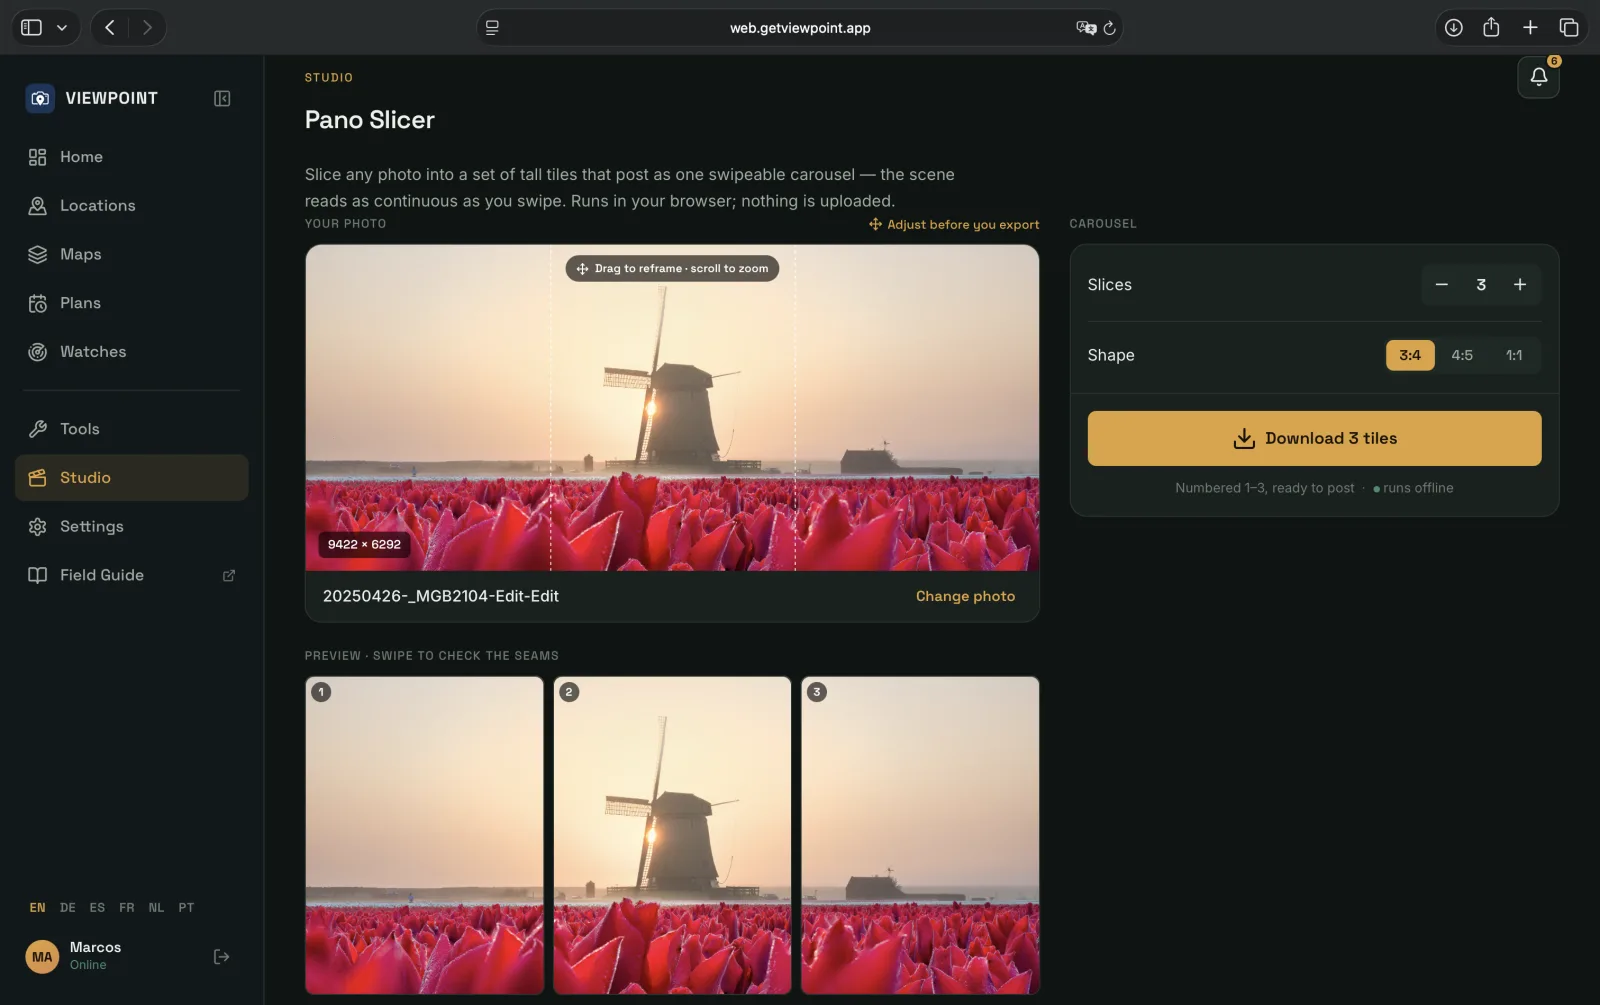
- Slice any photo, not just ultra-wide panoramas. Pick anything from a gentle wide shot to a stitched 180° sweep.
- Choose how many tiles — from 2 up to 10. Ten is the most a single carousel post holds, so you can stretch a big panorama across the whole set or keep a wider shot to just a couple of frames.
- Pick the tile shape. The tall new 3:4, classic 4:5, or 1:1 squares — whichever suits the post.
- Frame it yourself. Drag to move the photo and pinch to zoom behind a fixed crop frame, so you place the carousel exactly where you want it — no more settling for an off-centre or lopsided cut.
- See the seams before you commit. A live preview shows exactly where each cut lands and how the tiles line up as a swipe, so nothing important gets split awkwardly.
- Save numbered, ready to post. The tiles come out numbered in order, so you upload them left-to-right and the carousel reads as one continuous scene.
Panorama Pan — a wide shot becomes a vertical video
Some scenes are too wide to show all at once and too good to crop. Panorama Pan turns a wide photo into a vertical video that glides across the shot — a moving window that reveals the scene end to end, sized for Reels, TikTok and Shorts.
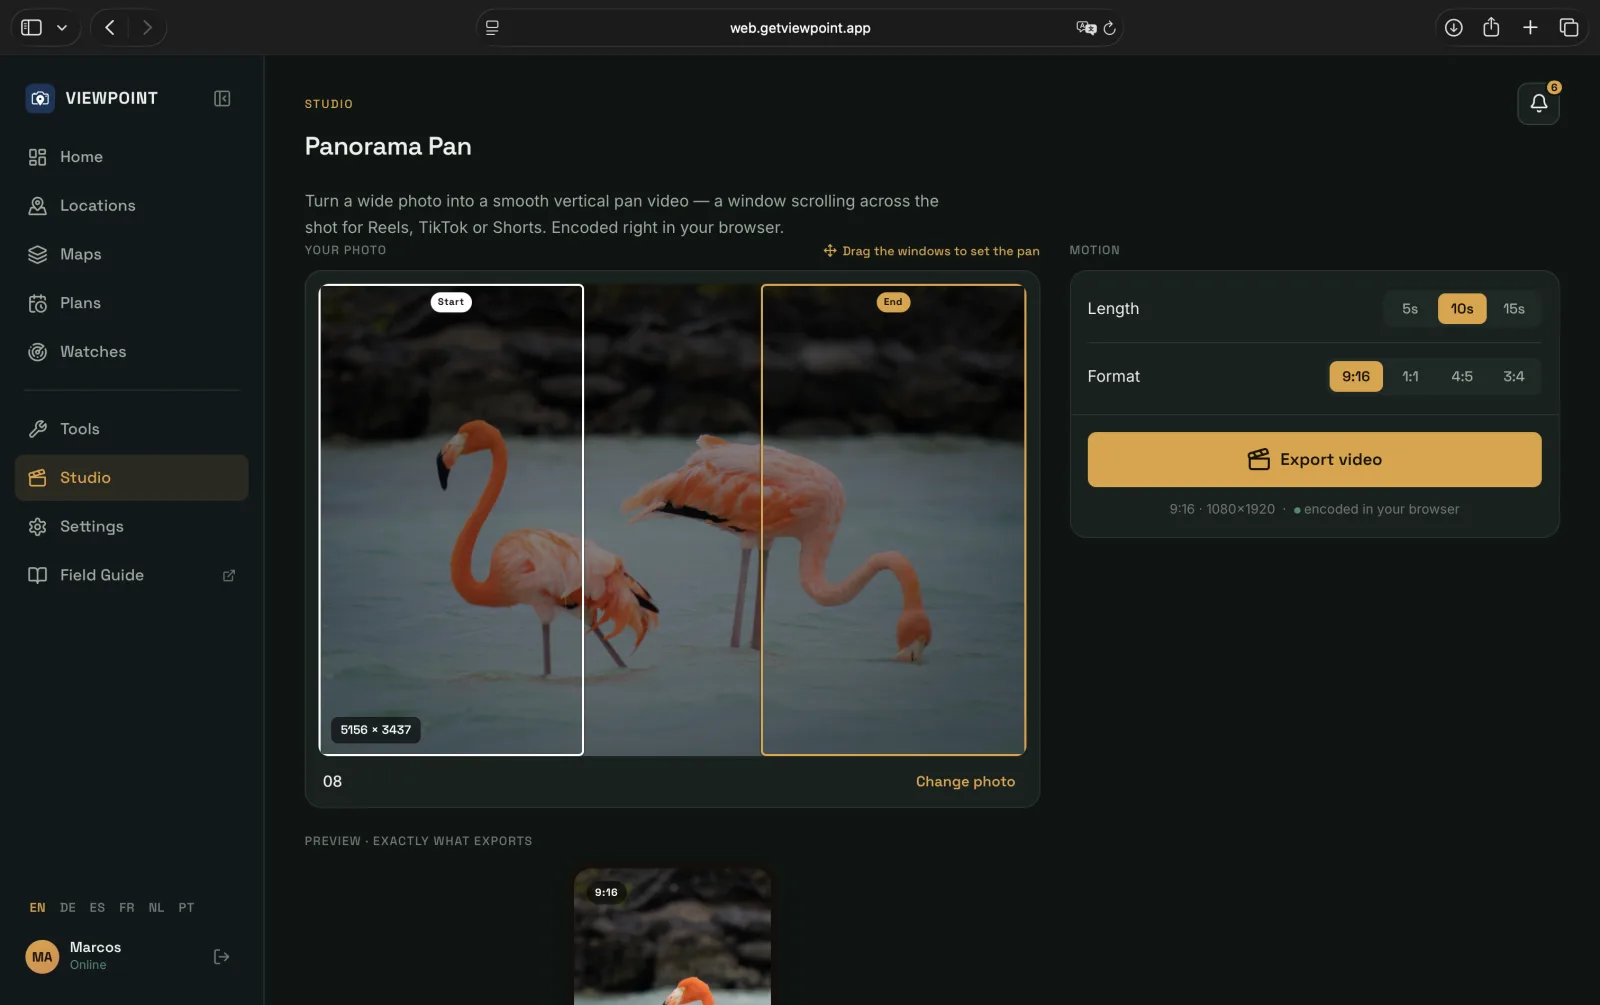
- A smooth, steady glide across your panorama, with no camera or editing app needed.
- Set where the pan starts and ends. Drag the start and end windows across the shot to choose exactly what the video sweeps between.
- Made for vertical feeds. Choose the video shape — full-height vertical, square, 4:5, or the tall new 3:4 — to fit wherever you’re posting.
- Set where the glide starts and ends. Drag the start and end frames across the photo to choose the sweep, nudge it up or down, and watch a true-to-output preview of the finished frame as you scrub.
- Pick the length so the pace suits the scene, and preview the motion before you export.
- Save the finished video to your device, ready to upload.
Grid Slicer — one photo becomes a profile-grid mosaic
Some shots deserve pride of place at the top of your profile. Grid Slicer cuts one photo into a 3-column mosaic — a 3×1, 3×2, 3×3 or 3×4 block of tiles that reassembles into the full image across the top of your Instagram grid.
- Choose the shape. Pick how many rows deep the mosaic runs, from a single row to a full four-row block.
- Frame it. Drag and zoom the photo behind the grid to set exactly what each tile shows.
- Posted in the right order. The tiles are saved in the order you post them — bottom-up and right-to-left — so they land back in place at the top-left of your grid with no guesswork.
- Save the tiles to your device, numbered and ready to upload one after the other.
Spec Card — show exactly how you got the shot
Some photos are worth explaining, not just posting. Spec Card reads a photo’s shooting settings and burns them onto a shareable card: your shot as a soft, blurred backdrop with the aperture, shutter speed, ISO, focal length, camera and lens laid out razor-sharp on top — the story behind the frame, at a glance.
- Pick a photo, and Viewpoint reads the rest. The settings your camera saved with the shot — aperture, shutter, ISO, focal length, camera and lens — come straight off the file. No typing anything in.
- Two looks. A minimal style with the settings floating over the scene, or a tidy panel that lays them out like a spec sheet — pick whichever suits the post.
- Choose the shape. Match your photo’s own proportions, or pick a square, 4:5, or the tall new 3:4 — whichever fits where you’re posting.
- Handles a quiet photo gracefully. A screenshot or a photo with no shooting data still gets a clean card — it just says so, instead of showing blanks.
- Fix the camera or lens by hand. When a body reports an odd or blank name, or an adapted or manual lens reports nothing, tap Edit specs and set the label yourself — or add one to a photo that never had it. It only changes the card, never your photo.
- Add what the photo can’t say. A file records the exposure, but not how you worked. Under Technique, say whether you were handheld or on a tripod, what was on the front of the lens — a solid ND from 1 to 15 stops, a polarizer, a graduated ND, or any combination of the three, because that is how filters are actually used — and whether the frame is a stack, of how many exposures. Type the count rather than tapping it up, so a focus stack or an astro integration of several hundred frames is a moment’s work. Whatever you set rides on the card as a quiet second row under the exposure figures. Leave it alone and your card looks exactly as it always did: it never invents “handheld” or “no filter” to fill space, and it starts fresh with each new photo, because it describes that shot rather than you.
- Everything on one screen. The card’s settings aren’t buried in a separate sheet — pick the look, then your gear and your technique sit right under the preview, so you can see what the card says and change it without hopping back and forth. The preview updates as you go. Same on iPhone and on the web, and both run the same shooting-data engine, so a card made on your laptop says exactly what the one made on your phone says.
- Sign it with your handle. Add your handle once and it rides on the card as a subtle credit — and it’s remembered, so it’s ready on your next card too, here and on Share the Plan.
- Save the finished card to your device, ready to post.
Share the Plan — pair the plan with the shot
You didn’t just get the shot — you planned it. Share the Plan takes a shoot plan you already saved and the photo you came home with, and turns them into a single shareable card: your result photo as the sharp hero image, with a small inset of the plan map — where you stood and what you aimed at — tucked in the corner. “You planned it, you shot it,” in one frame.
- Pick a plan, then your photo, and Viewpoint does the rest. No typing — the card pulls straight from the plan you already saved.
- Pairs the map with the photo. A small map inset shows the shot you set up — your camera spot, your subject, and the line between them — right next to the result.
- Shows the light you planned around. For a sun plan, the map draws a line from where you stood toward where the sun sat, with a short note on the light — back-lit, side-lit or front-lit, and how far off your shot it was. The “why” of the plan, on the card.
- Drag to reposition. Once you pick a format, drag the photo to frame it exactly how you want inside the card — no more settling for a centred crop.
- Shows roughly where, never the exact spot. The card names the area, not the precise viewpoint you found, so sharing your shot never hands it away.
- Includes the details that matter. When you planned the shoot and the lens you used — each shown only when you have it, never a blank placeholder.
- Choose the shape for where you’re posting. From a full-height 9:16 story or Reel, through 4:5, 3:4 and square feed posts, to a 16:9 landscape — or match your photo’s own proportions.
- Save the finished card to your device, ready to post.
Setup vs. The Shot — the behind-the-scenes reel
The photo people scroll past is the one they’ve seen before; the one they stop on shows how it was made. Setup vs. The Shot pairs a quick behind-the-scenes moment — a clip of you working, or a photo of your setup — with the finished frame it produced, into one short vertical reel, in the “what my phone sees vs. what my camera sees” style feeds love.
- A clip or a photo for the setup. Use a few seconds of behind-the-scenes video, or a still of you in position — whichever you have.
- Your hero shot as the payoff. The reel plays your setup, then lands on the finished photo, held for a beat.
- Frame each shot exactly how you want. Drag to reposition and zoom the setup and the hero photo inside the frame, so nothing important gets cropped out — what you see in the preview is what exports.
- Your own captions. Pre-filled with the trend — “What my phone sees” over the setup, “What my camera sees” over the shot — and yours to reword or clear.
- Pick the hand-off. A clean cut, a soft crossfade, or a slide from one to the other.
- Set the pace. Dial how long the setup and the shot each hold.
- Made for vertical feeds. Full-height 9:16, square, or the tall 3:4.
- The clip’s own sound, faded out under the hand-off so it ends cleanly.
- Save the finished reel to your device, ready to post.
Before / After Wipe — show the edit, not just the result
The edit is half the story. Before / After Wipe turns your raw scout frame and the finished photo into a short looping video where a labelled line sweeps across — raw on one side, final on the other — the kind of reveal video feeds love.
- Two photos, one clip. Pick the straight-out-of-camera frame and your finished edit; the tool lines them up.
- A clean, labelled sweep. A divider glides across and back, with BEFORE and AFTER tags so the story reads at a glance, then loops seamlessly.
- Ready for feeds. Export a compact, share-ready video and post it anywhere.
Compress — fit any export to a size
A full-resolution export off your editor can be 70, 80, a hundred megabytes — and then the upload form says 10, the email bounces, the print lab won’t take it. Compress takes your photo down to a size you name, and finds the best-looking way to get there.
- Name the size, not the settings. Pick a target — 10 MB, 5 MB, 2 MB, or type your own — and Viewpoint searches for the highest quality that still fits under it. No guessing at a quality slider until the file happens to be small enough.
- Or drive the quality yourself. Prefer to set the quality by hand? Flip to manual and watch the file size update live as you move the slider.
- JPEG, PNG or HEIC. Choose the format you need. PNG is lossless — there’s no quality to trade away — so for PNG, Compress reaches your target by resizing instead, and tells you the new dimensions.
- Honest when a size just won’t fit. If a target is smaller than the image can reach, Compress gets as close as it can and says so, rather than quietly missing.
- Save it wherever it’s going. Send the smaller file to your Photos, your Files, or straight into a share sheet — or, on the web, download it.
- On your phone, it’s also a Shortcut. Add Compress Image to a Shortcut or the Action button and shrink a photo to a target size without even opening the app — handy for a one-tap “compress the latest photo and email it” flow.
Studio on Android
Viewpoint for Android is on its way, and Studio will come with it: seven of the eight tools, in their own Studio tab in the bottom bar, alongside Locations, Maps and Tools. Everything they make will be saved into your gallery — photos and videos both, filed into a Viewpoint album on Android 10 and later — as well as handed to the share sheet, so an export is a file you still have tomorrow whether or not you post it straight away. The work itself will happen on the phone — your photos and clips are never uploaded to make any of it.
Nothing below is available to install yet. Here’s what each tool will do in that first Android release, and what’s still to come after it.
- Pano Slicer slices any photo into 2 to 10 carousel tiles, previewed as a swipe, and saves them numbered in upload order. Still to come: the tiles are 4:5 only — no 3:4, no square — they’re centred for you rather than framed by hand, and you judge the cuts from the finished tiles rather than from guides drawn over the photo.
- Panorama Pan turns a wide photo into a vertical video that glides across it, in 9:16, 4:5 or square. Still to come: the glide is a single fixed sweep of the whole frame at a set length — choosing where it starts and ends, setting the pace, watching the motion before you export, and the tall 3:4 shape.
- Grid Slicer cuts a photo into a 3×1, 3×2, 3×3 or 3×4 profile mosaic, previewed as it will read, and saves the tiles in posting order. Still to come: the mosaic is centred for you rather than framed by hand.
- Spec Card reads your aperture, shutter, ISO, focal length, camera and lens off the file and lays them over the shot, in the photo’s own proportions — and a screenshot or a photo with no shooting data still gets a clean card that says so. Still to come: one look rather than two, with the photo behind it dimmed rather than softly blurred; choosing the shape; correcting a camera or lens name by hand; the Technique row for tripod, filters and stacks; and your handle on the card.
- Share the Plan turns a saved shoot plan into a card with its name and the date and time it was planned for, plus the rough area — never your exact viewpoint — whenever the area can be looked up. Still to come: it’s the plan on its own. No photo as the hero, no map inset, no note on the light you planned around, no lens line, no choice of shape, no repositioning and no handle.
- Setup vs. The Shot pairs a behind-the-scenes clip with your finished frame into a 9:16 reel, with your own captions, the hold of each part under your control, and a cut or a crossfade at the hand-off. Still to come: a still photo as the setup, the clip’s own sound, the square and 3:4 shapes, the slide hand-off, framing each shot by hand, and seeing the reel before it exports.
- Before / After Wipe takes your raw frame and your finished edit and exports the same looping, labelled sweep as everywhere else. Still to come: you see the two photos you picked rather than a preview of the finished clip.
- Compress won’t be in that first Android release.
Everything else on this page is on iPhone and on the web today. This page is updated as Android catches up.
Nothing leaves your device
Every Studio tool does all its work on the device in front of you. Your photo isn’t sent anywhere, there’s no account required to use these tools, and whatever you get back — tiles, video or card — is yours to post wherever you like.
Where to find them
The publishing tools are part of Viewpoint’s toolkit and are included in every paid Viewpoint plan.
- On the web — Pano Slicer, Panorama Pan, Grid Slicer, Spec Card, Share the Plan, Setup vs. The Shot, Before / After Wipe and Compress are available now in the web app. Open the tools menu, pick your photo (or a clip), and save the result.
- On iPhone — all eight are available now: Pano Slicer, Panorama Pan, Grid Slicer, Spec Card, Share the Plan, Setup vs. The Shot, Before / After Wipe and Compress (with its Compress Image Shortcut) live in the app’s own Studio tab in the bottom bar, alongside Locations, Maps and Tools — no longer tucked inside the Tools hub.
- On Android — Studio is in the app: Pano Slicer, Panorama Pan, Grid Slicer, Spec Card, Share the Plan, Setup vs. The Shot and Before / After Wipe, in their own Studio tab, saving straight into your gallery. Each tool starts out with fewer controls than its iPhone and web counterparts — Studio on Android sets that out tool by tool. Compress is not on Android yet.