🌅 Sun · Golden & Blue Hour
How to plan the sun's position: azimuth and elevation

Planning the sun's position is how you plan the photograph: where the sun sits decides which face of your scene is lit and whether it's front, side, or back light — and that position is geometry you can predict to the minute, weeks ahead.
Most photographers treat the sun as weather — something you check on the morning of the shoot and hope cooperates. But the sun’s path is pure geometry, and geometry is predictable. Once you can describe where the sun will be with two numbers, you stop hoping and start planning: you choose the light you want, then find the date and time that delivers it. This guide teaches the two coordinates that pin the sun to the sky, why they swing with the seasons, and how to turn that into a repeatable plan.
The two numbers that locate the sun
Every position of the sun in the sky is fully described by two angles.
- Azimuth is the sun’s compass bearing along the horizon — the direction you’d point if you turned to face it. It’s measured in degrees clockwise from north: 0° is due north, 90° due east, 180° due south, 270° due west. Azimuth answers which way the light comes from, and therefore which face of your subject is lit and which falls into shadow.
- Elevation (also called altitude) is how high the sun sits above the horizon, in degrees. The horizon is 0°; straight overhead is 90°. Elevation answers how the light behaves — how long the shadows are and how raking, or grazing, the light is across a surface.
Hold those two together and you have the sun nailed: azimuth says where it is on the dial, elevation says how high it has climbed. Change either one and the photograph changes with it.
How azimuth sets light direction
Stand a subject in front of you and walk the sun around the compass. When the sun is behind you, lighting the front of the scene, you get front light — even, low-contrast, every detail visible but the scene a little flat. When the sun is off to the side, you get side light — shadows rake across the surface and reveal texture in rock, sand, bark, and ripples. This is why golden hour is so prized: a low sun is almost always a side or three-quarter light. When the sun is in front of you, behind the subject, you get back light — rim-lit edges, glowing translucent leaves, long shadows reaching toward the camera, and the chance of a sunstar if you clip the disc behind an edge at a small aperture (around f/16–22).
None of these is “correct” — they’re choices. A mountain ridge that’s a textured masterpiece under side light is a flat grey wall under front light. Deciding the light direction is deciding the photograph, and azimuth is the dial you set it on. For a deeper look at how the warm low-angle windows behave, see our guide on how to shoot golden hour and blue hour.
How elevation sets shadow and mood
Elevation controls shadow length and the “rake” of the light. The lower the sun, the longer the shadows and the more they skim across the surface, picking out every bump and furrow. The physics is simple: shadow length grows as the sun drops, stretching toward infinity as elevation nears 0°, and shrinking to almost nothing when the sun is high overhead.
A rough sense of it:
| Sun elevation | Light character | Shadow length |
|---|---|---|
| Roughly +6° down to −4° (golden hour) | Warm, soft, raking | Very long |
| About 10–20° | Bright, directional | Moderate, sculpting |
| Around 45° | Neutral, contrasty | Short |
| Near 90° (tropical noon) | Harsh, flat top-light | Almost none |
This is why a scene shot at noon looks lifeless and the same scene at sunrise looks carved from light: the low sun lays its shadows sideways across the texture. Elevation is also how the twilight windows are defined — golden hour roughly +6° down to −4°, blue hour roughly −4° to −8° below the horizon.
Why the same spot gives different light in June and December
Here’s the part that turns sun position from a fact into a planning tool. The sun rises in the east and sets in the west — but the exact bearing of rise and set is not fixed. It swings north and south through the year with the seasons.
At mid-northern latitudes:
- Around the summer solstice (late June) the sun rises in the northeast and sets in the northwest, arcing high across the south.
- Around the winter solstice (late December) it rises in the southeast and sets in the southwest, staying low.
- At the equinoxes (March and September) it rises due east and sets due west — the only days it does.
The width of that swing depends on latitude: the further you are from the equator, the wider the sun’s rise/set bearing wanders between the solstices. Near the equator the swing is narrow and the sun drops nearly vertically; up at high latitudes the bearing roams across a huge arc, and in midsummer the sun may barely set at all. In the southern hemisphere the seasons flip — the bearing swings the other way and the sun tracks across the northern sky.
The practical upshot: the same viewpoint is a different photograph in June than in December, and at sunrise than at sunset. A sea cliff that catches a back-lit sunrise in summer might never see the sun touch its face in winter. Knowing the seasonal swing tells you which months a shot is even possible.
Turning it into a plan
The workflow is the same every time, and it runs backward from the image:
- Pick the subject — the ridge, the arch, the lighthouse.
- Decide the light you want — back-lit at sunrise? Side-lit through golden hour? Sun setting into a notch in the valley?
- Find the date and time the sun sits at the matching azimuth and elevation.
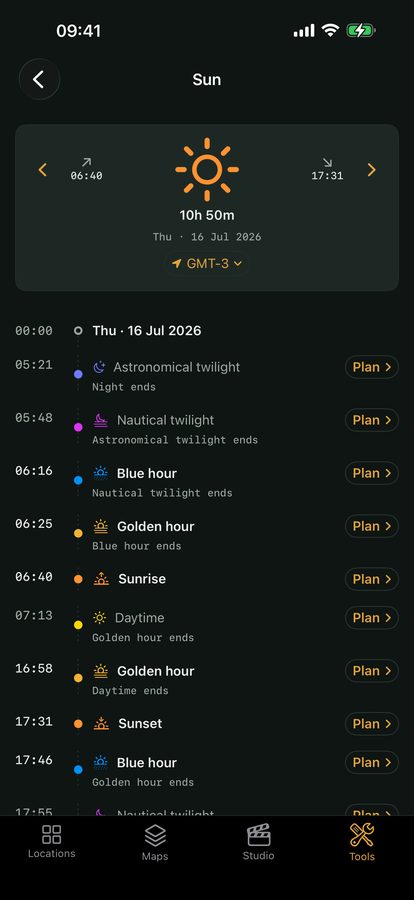
That last step is where the app does the arithmetic. The sun timeline gives you the elevation-defined windows — sunrise, golden hour, blue hour, and their clock times for your spot and date. The alignment planner solves the azimuth problem directly: it finds the dates and times when the sun lines up behind or over a chosen subject, so you can plan a sun-into-the-valley or sun-behind-the-peak shot to the minute. On location, you can preview the sun’s whole arc across the real horizon, so you see where it will rise, cross, and set before committing. For the moon and dark-sky side of the same problem, the Sun, Moon & Milky Way almanac extends this to night planning.
Tie it back into scouting. When you find a promising location at the wrong time of day, don’t just shrug — note the light you wish you had, let the app tell you when the sun will be in that position, and come back for it. That habit is what separates a lucky frame from a planned one.
Quick-start checklist
- Azimuth = direction, elevation = height. Together they fix the sun in the sky.
- Set the light with azimuth: sun behind you is front light, beside you is side light, in front is back light.
- Read mood from elevation: low sun means long, raking shadows and warm texture; high sun means short shadows and flat light.
- Mind the season: rise/set bearing swings toward the northeast/northwest in summer, southeast/southwest in winter (northern hemisphere), due east/west only at the equinoxes — wider the further from the equator.
- Plan backward: pick the subject, choose the light, then find the date and time the sun sits at the right azimuth and elevation.
- Scout, note, return when the sun is in position — let the alignment planner and sun timeline do the maths.