🧭 Planning & Weather
How to scout photography locations

Great landscape shots aren't found in the moment — they're found weeks earlier, in daylight, with no pressure. Scouting is the deliberate work of locating a composition before the light ever shows up, so when conditions finally line up you drive straight to a spot you already know cold.
The photographers who consistently come home with the shot aren’t luckier — they’re scouting. Scouting is the craft of finding and judging a location before the conditions arrive, so the moment good light breaks you’re standing in a known spot with a composition already worked out, not stumbling around a dark trailhead hunting for a foreground. It splits into three honest stages: research from home, walk the ground, and record it so the effort actually pays off. Get those right and luck stops being the variable.
Research from home: read the land before you drive
Most of a location’s potential is visible from your desk. Open a satellite-map service in its aerial view and read the terrain like a photographer, not a tourist. You’re hunting for the ingredients of a strong frame: ridgelines and lead-in features — rivers, roads, shorelines, fence lines — that draw the eye from the edge of the frame into the scene. Water you can use for reflections. A clean foreground anchor with something big behind it. While you’re there, note the access roads, the nearest parking, and roughly how far the walk-in is.
Then switch to a topographic map. Contour lines packed tight mean steep ground; widely spaced means flat. This is how you find the elevated viewpoints — the saddle, the bluff, the overlook — that let you shoot down into a valley instead of being trapped on the valley floor looking up. Elevation is leverage: a few hundred metres of height can turn a blocked view into a layered, depth-rich composition.
Finally, browse geotagged photo-sharing sites to see what the place actually looks like on the ground and, just as usefully, what hour and season it’s usually shot in. Use this as reconnaissance, not a recipe. The temptation is to copy the cliché frame everyone already has; resist it. Once you know the standard shot, deliberately go looking for a fresh angle — a different foreground, a lower viewpoint, a tighter focal length, the scene at a season nobody bothers with. The research tells you what’s there. Your job is to find what’s not in everyone’s feed.
For how this desk work feeds into a full shoot plan, see how to scout and plan a photo shoot.
Walk the ground: scout on foot, in flat light
Maps lie by omission — a fence, a power line, a closed gate, a better rock thirty metres left. So visit the location in person, and do it at midday when the light is bad. That sounds backwards, but it’s the whole trick: at noon there’s no pressure to shoot, no clock running on golden hour, nothing to do but find compositions. You’re scouting, not shooting. Bad light is free time.
On the ground, answer the questions a map can’t:
- Where exactly do you stand? Walk the viewpoint until the layers line up — foreground anchor, midground, background stacked for depth.
- What are the foreground options? A close rock, flowers, a tide pool, a reflection. The foreground is what gives a wide landscape its three-dimensional pull.
- Which way will the good light come from? This is the one to get right. Low, warm light at the start and end of the day rakes across a scene from the side, and side-light is what reveals texture in dunes, rock and ridgelines. Work out which face of your subject that light will hit — and remember the sun’s rise and set points drift across the horizon with the season (north in summer, south in winter, in the northern hemisphere). A scene that catches beautiful side-light in June can be back-lit or unlit in December, so note the season as well as the direction.
- What are the hazards, the parking, and the walk-in time? Tides that cut off a beach, a river crossing, a gate that locks at dusk, a forty-minute hike you don’t want to discover in the dark.
Record it properly: the part that makes scouting pay
Scouting you don’t write down is scouting you’ll repeat. The return trip happens in the dark, possibly months later, in a hurry — your memory will not cooperate. Capture, at minimum:
| What to record | Why it matters on the return |
|---|---|
| Precise GPS location | Drive and walk straight to the exact standpoint, in the dark, no hunting. |
| Compass bearing to the subject | Know which way to point before you arrive, so you can pre-visualise the frame. |
| Best light direction & season | Confirms when this composition works — the month and the hour, not just the place. |
| Access notes | Parking, walk-in time, gate hours, tide cut-off, hazards. |
The bearing is the quietly essential one. A GPS pin gets you to the spot; the compass bearing to your subject tells you which way to aim once you’re there — and lets you cross-check, before you ever return, whether the season’s light will actually land on the face you want lit.
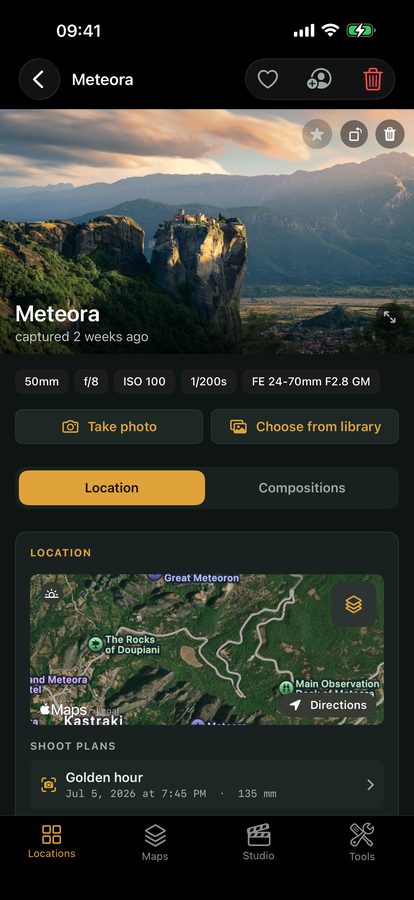
This is exactly what capturing a spot in the app is built for: it stamps the GPS, lets you save the bearing to your subject, and holds your own notes on light, season and access for the return trip. Honest scope, though — the app gives you sun and moon position, twilight timing, and weather alerts to plan the light; it does not do tides. If your location lives and dies by the water level, check a dedicated tide table and write the safe window into your spot notes yourself.
Close the loop: from known spot to finished frame
The payoff is simple and it’s the entire point. When broken cloud is forecast at sunset, or the moon’s rising in the right place, or fog is settling in the valley at dawn, you don’t gamble on a new location. You open your saved spots, pick the one whose pre-recorded light direction and season match the conditions, and drive straight there. The composition is already solved. All you’re managing on the day is the light — which is the only half of the photo that’s genuinely time-sensitive. Scouting did the rest in advance.
If you’re setting up your library of spots for the first time, the getting started guide walks through capturing your first one.
Quick-start checklist
- Research from a satellite view for ridgelines, water, lead-in lines and access roads; switch to a topographic map to find elevated viewpoints.
- Study geotagged photos to learn the place — then deliberately plan a fresh angle, not the cliché frame.
- Scout on foot at midday, with no pressure: lock down exactly where to stand, your foreground options, and which way the good light arrives.
- Note the season, not just the light direction — sunrise and sunset points shift across the horizon through the year.
- Record GPS, the compass bearing to your subject, light/season notes and access for every spot, so the return trip is a known quantity.
- Check a separate tide table for any coastal location — the app handles sun, moon and weather, not water levels.