🧭 Planning & Weather
How to build a photography watch list of places
Most photographers plan the other way round: they pick a place, then hope for the weather. The photographers who keep coming home with the shot do the opposite. They keep a short list of places they already know, and each day they ask which of them the sky is offering tonight. A watch list turns the forecast from a verdict on one trip into a menu of several. Here is how to build one that actually gets used.
Here is the problem with planning a photo around one place. The place is fixed, so the weather has to cooperate, and most of the time it does not. You either go anyway and shoot a flat sky, or you stay home and never find out. Meanwhile, somewhere forty minutes in the other direction, the fog is sitting in the valley and the sunrise is wide open.
A watch list fixes the direction of the question. Instead of “is it good at my spot?”, you ask “what is good tonight, and which of my places does it fit?”
Why a short list beats one great spot
Every place is good at something and poor at everything else.
- A west-facing coast is a sunset place and a poor sunrise place.
- A valley rim is a fog place on calm, cold, damp mornings and ordinary the rest of the year.
- A dark ridge an hour from town is an astro place on clear, moonless nights.
- A tall viewpoint is a storm-light place, and a place to avoid when lightning is near.
- A still lake is a reflection place on windless dawns.
If you only follow one of them, you get a good outcome a few times a season. If you follow five, one of them is usually offering something worth the trip. That is the entire idea.
How to build the list
1. Start with places you already know. A watch list is not a bucket list. It is for places you have scouted: you know where to park, where to stand and what the light does there. Walking into a new place with good conditions is a gamble on two things at once. (If you have not scouted much, how to scout photography locations comes first.)
2. Keep it to about three to six. Fewer and you are back to hoping. More and you stop reading the list, because every day has an excuse in it. It should fit in a single glance.
3. Mix the aspects. Aim for a spread across the compass and the conditions: something that faces west, something that faces east, something dark, something high, something near water. The mix is what makes the list useful. Five places that all want the same clear sky will all fail on the same night.
4. Mix the distances. Include a place you can reach after work, one for a half-day and one that needs an early start. The best conditions of the year rarely arrive on your day off, so the near place is the one you will actually use most.
5. Write down what each place is for. One line: “fog on cold calm mornings,” “astro on moonless clear nights,” “sunset when the western horizon opens.” This is the most useful part, because it is what you check against the forecast.
Match alerts to the place, not the other way round
This is where most lists die. If every place alerts you for every condition, you will get a notification every day and soon read none of them.
Arm only the condition that place is for: the fog alert on the valley rim, the clear-night alert on the dark ridge, the golden-light alert on the west-facing coast. A quiet phone then means nothing worth it right now, and a buzz means something. That signal is the whole value of the list.
Make the decision the evening before
A watch list works best as a ten-second habit, not a research project.
- Look at the next window for each place. What is expected, when, and for how many hours?
- Pick the best match, not the best place. Tomorrow’s clear dawn at the east-facing ridge beats the sunset you were hoping to catch at the coast under a lid of low cloud.
- Check the cost. A marginal condition at the place twenty minutes away beats a good one two hours away on a work night. Decide what drive a given condition is worth, and apply it the same way every time.
- Set the alarm. Then go to bed. The point of the list is that the thinking is already done.
For the rare event you cannot schedule — the aurora, a storm clearing, a fog that is only forecast a few hours ahead — the list is what lets you act in time. You do not have to find a place when the alert arrives; you already have one, and you know where to stand.
Keep it honest with a log
After each outing, write one line: place, condition, what actually happened. After a season, your own record tells you things no forecast can — that a particular ridge catches fog a degree colder than the town, that the coast works better with a little cloud than none, that the lake only mirrors before 6 a.m. Use it to prune the list: a place that keeps missing is not earning its spot. How to keep a shooting log covers what to record.
How Viewpoint helps
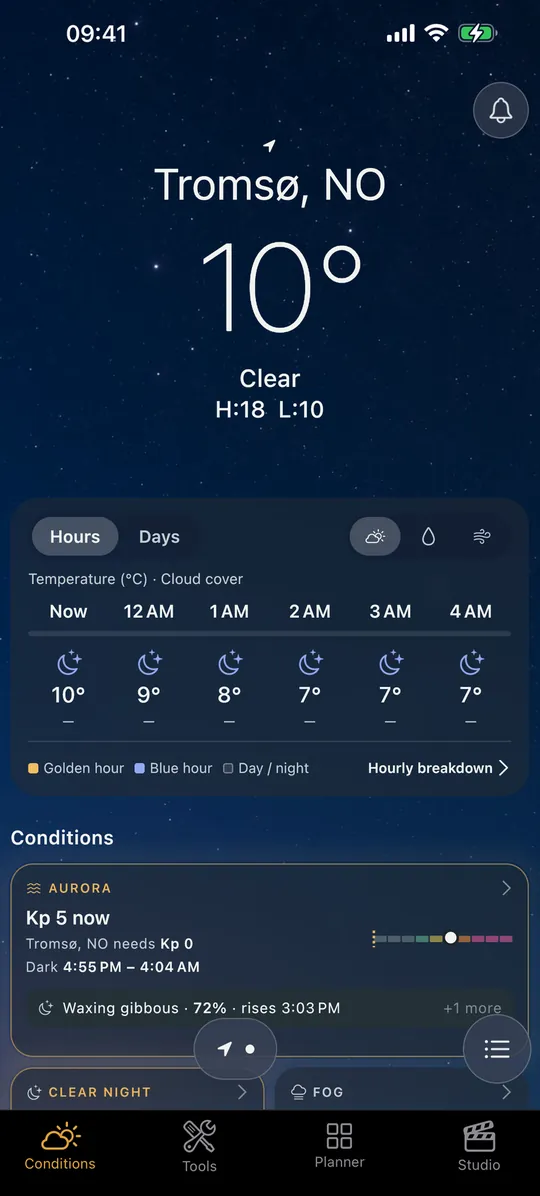
The Conditions tab is the watch list, already built for this. It pages through Your places: the places you choose to follow, starting with your current location, in the order you set. Swipe sideways to move from one to the next. Each place has its own page with the sky, a next window that names the earliest condition expected there and when, the hours ahead, and a tile for each condition: aurora, clear night, golden light, fog, snow, storm light and more.
You add any place on Earth by search, or from a saved spot with Add to Conditions; your whole library is not listed automatically, so the list stays short on purpose. Alerts belong to a place: you turn on exactly the ones that place is good for, and Viewpoint notifies you when that condition is heading for the area around it. For the aurora there is also a separate heads-up a few hours ahead, once a night, so you can plan the drive. The list and each place’s alerts are the same on every device you sign in to.
Conditions needs an Online subscription. The calculators, almanac and light meter, which help you decide when to be at a place once you have picked it, are free.
Quick-start checklist
- Follow three to six places you already know, not a bucket list.
- Spread them across aspects, conditions and distances.
- Write one line on what each place is for.
- Arm only the alert that place is for, so a buzz still means something.
- Each evening, pick the best match between condition and place, and weigh the drive.
- Log one line per outing and prune the places that never deliver.